
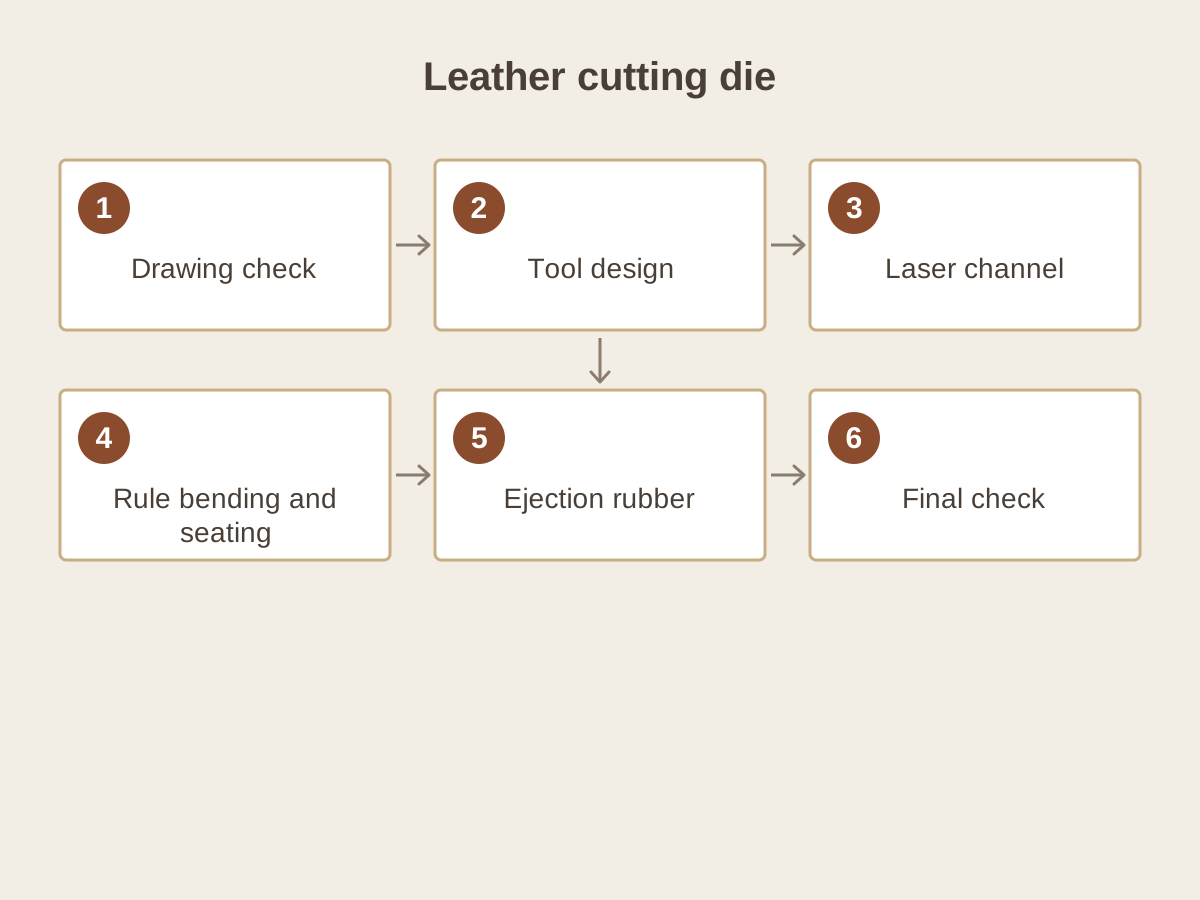
Once a bag body, belt end, shoe upper panel or wallet card pocket is approved, the same piece has to be cut hundreds of times to the same size. A leather cutting die is the tool that delivers that repetition: a steel cutting rule following the contour of the piece, seated in a plywood base. The trade also calls the same tool a leather die, clicker die or press knife. Production runs through six stages, and the choice made at each one decides how the die behaves on the press.
Which tool are we talking about?
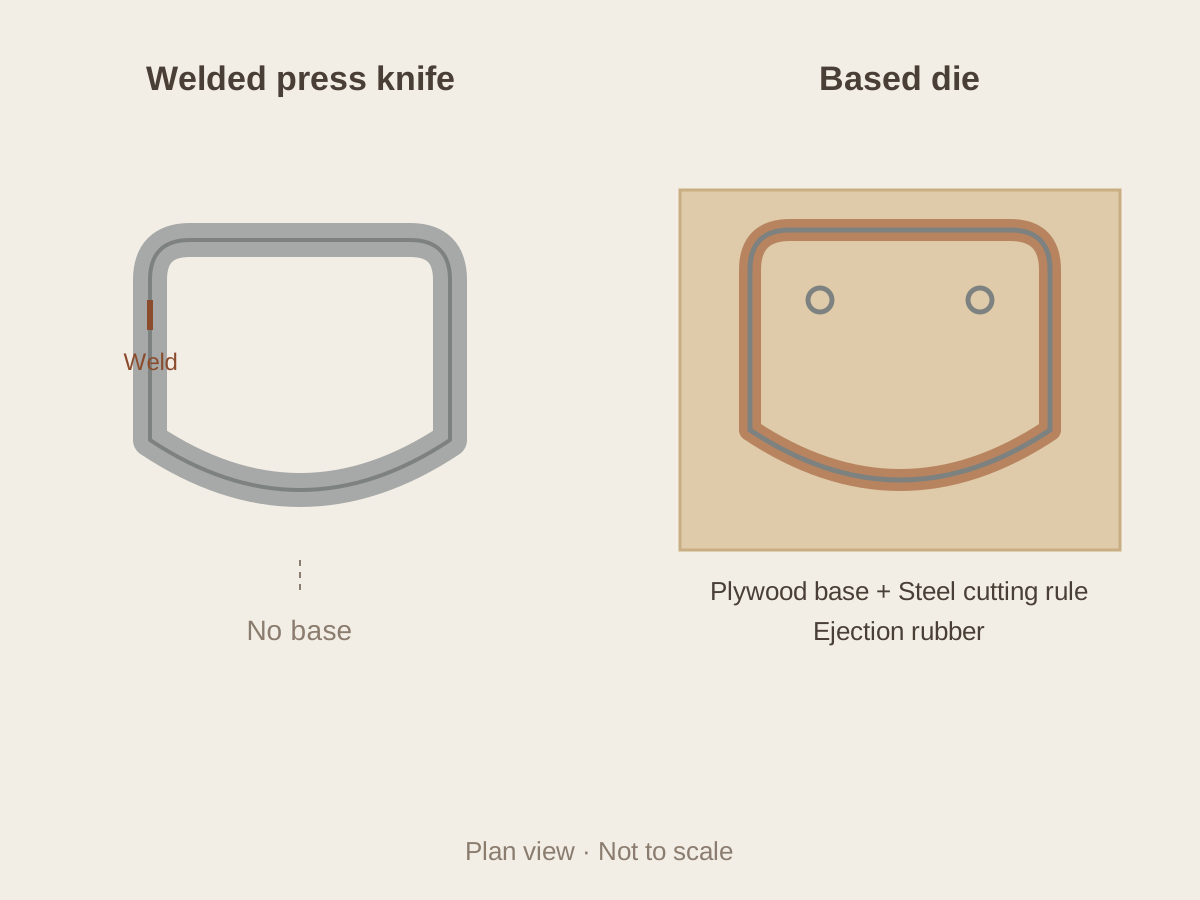
In the leather trade two different constructions are requested under the same name. The first is a tall, baseless press knife made by bending a steel strip and welding its ends. The second is the based tool that comes from the printing die trade: the rule is seated in a plywood base with laser-cut channels and ejection rubber is glued beside it. This article describes the production of the second construction.
The defining feature of the based tool is that several pieces can be combined on one base. The body, gusset and flap of a bag, or the card-pocket set of a wallet, sit side by side on the same plywood; every press stroke cuts the whole set. Because contours, holes and notches come from the drawing, the relationship between the pieces does not change during production.
Left and right pairs, size runs and mirrored pieces are planned separately in this construction. Since the international names clicker die and press knife can cover both constructions, describing the base, the rule height and the press used together in the order avoids confusion.
Stage 1: Checking the component drawing and the sample
Production starts with a 1:1 drawing or a physical sample of the piece, not with a photograph. In the PDF, AI or DXF file the outer contour of each piece must be a single closed line; seam allowance, folding allowance and assembly marks are shown on a separate layer from the cutting line. When a physical sample arrives, its contour is digitised and stretched or worn edges are separated from the true size.
At this stage holes, stitch notches, rivet and snap positions are verified one by one. A hole that shifts by a few millimetres on a leather piece spoils the alignment of a flap lock or a strap; the drawing check therefore covers the inner details as closely as the cutting line. For left and right pieces, whether mirroring follows the approved model is also confirmed here.
The die maker works the drawing to a dimensional accuracy of 0.05 mm. That value applies to the contour and the distance between rules; the stretch of the leather, its recovery after cutting and the shape it takes in stitching fall outside that tolerance and are judged on the sample piece.
| Information supplied | Where it is used in production |
|---|---|
| 1:1 closed-contour drawing | Path of the laser channel and rule length |
| Hole, notch and mark positions | Punch positions and notches on the rule |
| Left/right and size information | Number of pieces on the base and mirrored layout |
| Leather or synthetic leather sample | Rule edge, point thickness and rubber choice |
| Press used and cutting area | Base size and rule height |
Stage 2: Tool design, bridges and rule joints
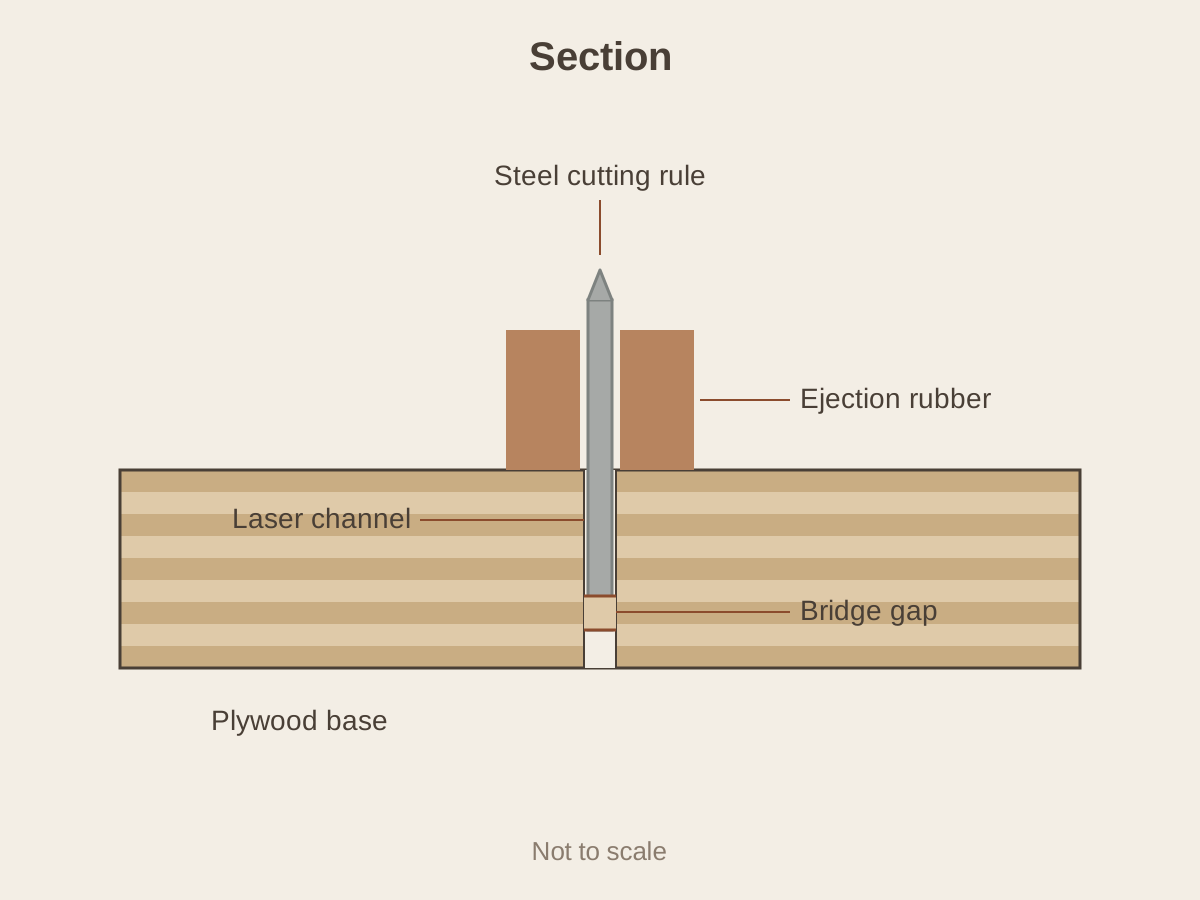
The approved contour does not go straight to the laser; the tool is designed first. If a closed contour were cut through the plywood from end to end, the centre of the base would drop out. Bridges are therefore planned along the channel where the plywood is left uncut, and bridge gaps are opened in the lower edge of the rule at the same points. Bridges keep the base in one piece and leave no mark on the cut edge of the product.
The joint where the rule strip starts and ends is also chosen at this stage. The joint is placed where it will not show on the grain side of the leather and away from tight bends; an edge that lies inside the seam allowance is usually a suitable place. Where punches are used for holes and small circles instead of bending rule, their diameter and position are entered into the design as well.
When several pieces share one base, the distance between them is set so that rubber and rule bodies have room. Two contours placed too close leave no room for the rubber to compress; pieces placed too far apart waste usable leather. Because leather direction and quality zone are decided by the cutting operator, the tool can also be split so that pieces can be placed on the hide individually.
Stage 3: Laser-cutting the channels in the plywood base
The base is the 18 mm plywood commonly used for flatbed dies. A CNC laser cuts the rule path from the tool design into the plywood as a channel. Channel width is set to the point thickness of the rule: a channel wider than the rule lets it move under the stroke, a narrower one forces the rule in and splits the plywood.
The laser follows every curve and corner of the drawing exactly. A doubled line, an open end or an overlapping contour left in the drawing is reproduced in the channel in the same way, which is why the drawing check matters most at this stage. Bridge positions are left uncut along the channel.
The grain and moisture content of the plywood affect the cleanliness of the channel edge. A dry, flat base with sound plies holds the rule in the same position for years; a damp or delaminated sheet lets the rule work loose.
Stage 4: Cutting, bending and seating the steel rule
The steel strip is cut to the length given by the tool design. Bridge gaps and, where required, stitch notches are opened in it. The strip is then bent to the curves of the drawing; tight bends are formed in bending tools, long arcs by hand. The bent rule is placed in the channel and driven in until it seats.
A rule is defined by three measures: height, thickness (point) and edge profile. In flatbed cutting the standard cutting rule height is 23.80 mm, and the press opening is set to it. A thin point makes tight bends easier, a thick point strengthens the body. On materials such as thick sole leather or laminated synthetic leather the rule body carries more load, so the point is chosen from the material sample.
The edge profile decides the cut edge of the leather. A centre-bevelled edge suits most leather-goods pieces; a single-bevel edge is chosen where one face of the cut edge has to stay square. The rule body is produced soft enough to bend, the edge hard enough to resist wear.
Stage 5: Ejection rubber and releasing the piece from the rule
On the stroke the rule enters the leather; when the press opens, the piece and the surrounding leather can stay pinched on both sides of the rule. Ejection rubber is therefore glued beside the rules. It compresses on the stroke and recovers when the die opens, pushing the leather off the rule. The rubber usually finishes 1.5 to 2 mm above the rule edge.
Because leather is thick and elastic, rubber hardness and profile are judged differently from carton. Soft rubber is used around wide body pieces, harder rubber on both sides of narrow strap or handle pieces. Rubber colours indicate different hardnesses from one manufacturer to another, so the choice is made from hardness, profile and height rather than colour.
The fall of small slugs inside hole punches is planned at this stage too. A slug left inside a punch jams after a few strokes and spoils the hole; an ejector or slug cavity matched to the punch diameter prevents that.
Stage 6: Final check and the first pieces on the press
Before dispatch the seating of the rule, the joints, the bridges, the punch positions and the rubber layout are reviewed, and the contour is compared with the drawing. On request a photograph of the finished die is sent. The die check confirms dimensions and assembly; how the leather actually cuts is seen on the first pieces in the customer's own press.
The points to look at on the first pieces are clear: is the cut complete along the whole contour, are holes and notches where the drawing puts them, does the piece release from the rule easily, do left and right pairs match when laid on top of each other. When the result of this check is recorded in the die archive, the same file and the same setting can be used on a repeat order.
The press, the cutting pad and the pressure setting directly affect this result. How the same die behaves on different presses, and why the press details are requested with the order, is explained in the guide on matching leather clicker presses and cutting dies.
What separates a leather tool from a carton die
The production sequence is the same as for a carton box die; the differences come from the material. Leather has no creasing or perforating rule, every line is a cutting line. Because the material is thicker and more elastic than board, the sharpness of the edge, the point thickness and the rubber choice carry more weight. Leather pieces are usually cut singly or in small sets, so the die base is also kept compact to suit the head of the press used.
Another difference is leather direction. On a board sheet the position of the piece is fixed by the drawing; on leather the operator positions the piece by quality zone and stretch direction. The die cannot make that decision; it only repeats the approved shape of the piece exactly in every placement.
| Topic | Carton box die | Leather cutting die |
|---|---|---|
| Rule types | Cutting, creasing, perforating, combination | Cutting rule and punches only |
| Material thickness | Thin sheet, full cut in one stroke | Thick and elastic; edge and point choice dominate |
| Piece placement | Fixed layout on the sheet | Operator chooses direction and zone on the hide |
| Base size | Large, matched to the machine bed | Compact, matched to the press head |
| Ejection rubber | Soft over wide areas | Hard on narrow strips, soft around bodies |
What information goes to the die maker?
Each of the six production stages rests on one piece of order information: the drawing or sample, the leather sample and its thickness, left/right and quantity details, hole and notch notes, the press used and its cutting area. A quotation prepared from this information states the rule height, the point, the base size and the rubber layout clearly.
Bag, belt and leather-goods pieces are handled in the leather cutting die service, shoe upper panels in the shoe upper leather cutting die service and wallet sets in their own service. When a model has several pieces, tool design is completed faster if each piece's name, size and quantity to cut is written on its own line.


